
Rising almost 2000m from the Patagonian steppe, the jagged granite spires of Torres Del Paine dominate this region of Chile and make for one of the most jaw-dropping sights in South America. This Unesco Biosphere reserve is one of the finest national parks in the world, covering 181,000 hectares of turquoise lagoons, glacier-fed waterfalls and verdant forest.
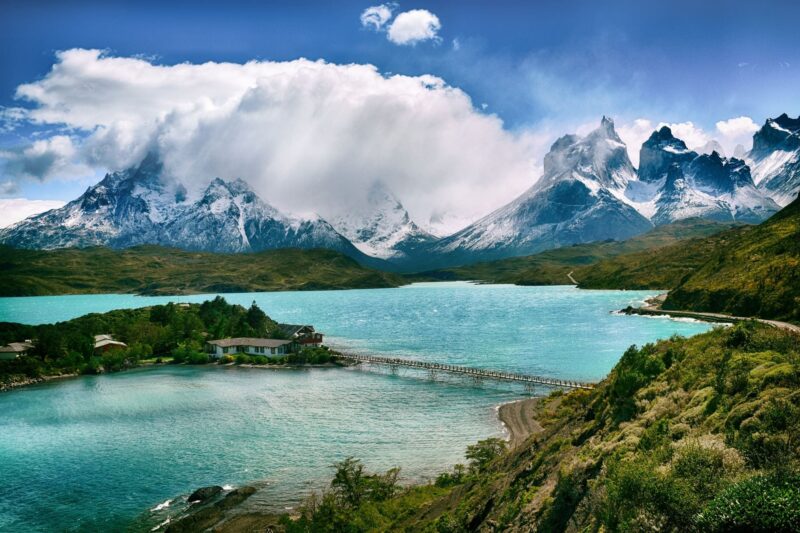
However, It’s Torres Del Paines rocky peaks that draw most visitors to the park. The three sheer peaks of Los Torres and the unmistakable outline of Los Cuernos are almost a pilgrimage site for hikers from around the world who flock here to walk the famous ‘W’.

Getting to Torres Del Paine from Puerto Natales
During the high season from October to April, 5 different bus companies provide daily trips from Puerto Natales to Torres del Paine, stopping first at Laguna Amargh (2hr journey) where you will have to hop of the bus to pay your park entry fee (CH$25,000 for foreigners or CH$35,000 if staying for more than 3 days as of Jan 1 2020; note that this can also be paid at the bus station in Puerto Natales), then onwards to Pudeto (3hrs) where you will leave the bus if you are catching the catamaran to Paine Grande, before finally reaching the administration building (4hrs 15).
Return tickets between the park and Puerto Natales cost CH$15,000. During the high season between September and April, the buses leave Puerto Natales at 7am, 7.30am and 2.30pm, getting to Laguna Amarga at 9am, 9:30am. and 4.45pm respectively and Pudeto at 10:00am, 10.30am and 5.30pm. For the return leg of the journey, buses pick up from Pudeto at 1pm, 1.30pm and 7pm and from Laguna Amarga at 2pm, 2.30pm, 7.45pm each day.
Check Bus prices and availability to Torres Del Paine
It is worth noting that between the park’s busiest months, Bus Sur also run a 6.40am service that reaches Pudeto at 8.45am, in time for the first catamaran of the day.
What is the W Trek?
Although there are myriad hiking routes in Torres Del Paine National Park, the most famous and most popular is the W, a 4 to 5-day hike that takes in the park’s most spectacular sights: from the iconic spires of Mirador Las Torres and the enormous Grey Glacier to the steep trail along Valle Francis and the contorted, multicoloured horns of Los Cuernos. It runs up three valleys, creating the W shape that gives it its name. In each of those valleys lies one of the iconic sights of the park
With a route of 80km (50 miles) the W is moderately difficult, mostly on gentle terrain but with the occasional climb up to 800m. With that in mind, you don’t necessarily have to be an experienced hiker, but it helps to be reasonably fit, especially as you will be hiking with a backpack, sometimes for up to 8 hours in a day.

When is the Best Time to Hike the W?
Accommodation on the W Trek
You have two options of where to stay while hiking the W: In a refugio or on a campsite. Deciding which is best for you is generally a toss-up between ease and cost. While refugios offer an extra level of comfort, they can be much more expensive than camping.
Refugios
A refugio is basically rustic hostel-meets-hotel and they are dotted around all the major stopping points on the trek. They’re open year-round and have dorm-style rooms, shared bathroom facilities with hot showers and a basic, on-site restaurant/canteen and bar. The rooms are generally warm and clean with comfortable beds and the refugios themselves often have open and sociable communal areas where you can relax in front of a roaring fire after a hard day of hiking.
There is also the added bonus of not having to haul camping equipment, bedding (although I recommend bringing your own sleeping bag to avoid the extra rental cost at the refugios), and food with you throughout your trek. All refugios provide meals on a full-board (breakfast, dinner, & a packed lunch), half-board (breakfast and dinner) or meal-by-meal basis. The food is expensive, even by Patagonian standards, so there is the option of using the refugios kitchen to cook your own food if you wish.
Most refugios also have campsites with separate facilities if you would prefer to camp out of the main building.

Camp Sites
If you prefer a wilder experience in which you get to sleep under the stars and stare at the park’s incredible views through your doorway, you can camp at certain points along the W Trek’s trail. At refugio campsites you have the option of sleeping in pre-erected tents, meaning you don’t need to carry your own equipment. Sleeping mats and warm sleeping bags are available to rent (although I would recommend bringing your own as they don’t add much extra weight) to keep you cosy. As these campsites are often on the grounds of nearby refugios, you have access to toilets, warm showers, and the communal spaces of the refugios where you can enjoy a hot meal or cook your own dinner.
There is also a free campsite at Italiano, run by the National Park authority (CONAF). You will need to bring your own tent and facilities are a little basic, but they do have on-site toilets, running water and a cooking shelter. Note: You still have to book this free campsite in advance.
BOOKING YOUR ACCOMODATION
With Torres Del Paine being one of Chile’s most popular attractions and the W-trek being the most desirable hiking routes on the South American continent, it’s safe to say that booking your accommodation in advance – even up to 2 months in advance during the high season – is essential. All refugios and campsites can be booked online but to complicate matters slightly, there are 3 different companies that you will potentially have to use, depending which camping spots you choose: CONAF, Vertice Patagonia, and Fantastico Sur.
To check which campsites you will need to book, check out my hiking itinerary lower down this page.
Fantastic Sur run Chileno, Frances, Los Cuernos and Las Torres and their booking site can be found here. The booking system is fairly simple. You just select your dates and then choose whether you would like to camp or stay in a dorm room using the drop-down boxes. After this, you can add additional extras such as sleeping bags and mats, full-board, half-board, or sperate meals. If you have any issues with the booking, you can email them at [email protected] or drop into their office in Puerto Natales.
Vertice Patagonia run both Paine Grande and Grey. Their booking site can be found here. The process for booking with Vertice is slightly different from the one for booking with Fantastico Sur. First, you will need to select the number of people, set your nationality to ‘another’ if you are not Chilean, and the currency to US dollars. On the next page, you will select the W-trek option and then on the following page, you can choose which accommodation you would like to book. If you follow my itinerary below, you will need to select the Grey and Paine Grande option, however, there are multiple combinations as well as the ability to book each one separately. If you have any issues, you can contact them at [email protected].
The only free campsite on the trek route is Italiano, managed and maintained by the National Park authority (CONAF). Although the site is free, you still need to make a booking in advance via the CONAF booking site. Make sure to print out your reservation and bring it with you.
What Equipment do you need?
If you plan on spending as little money as possible when hiking the W, you will need to bring plenty of camping equipment to avoid having to rent it at the refugio campsites. However, if you choose to stay in the dorm rooms or pre-erected tents, you will obviously avoid having to bring your own tent. I still recommend carrying a sleeping mat and sleeping bag as otherwise, you will have to pay to rent these each night despite forking out for a pre-erected camping spot.
Please remember that whatever you pack you will have to carry with you on your back for up to 7 hours a day so try to pack as lightly as possible.
Camping Essentials: Tent, sleeping bag, sleeping mat, small camping stove and gas canisters, a lightweight set of pans and cutlery, a bowl and a mug.
The weather is incredibly changeable in Patagonia, meaning that you can encounter almost every possible combination of sun, rain and snow that nature can throw at you over the course of just one day. I’m not joking: on one day of my hike, I went from hiking in shorts and a t-shirt in glorious sunshine to having to navigate my way through a blizzard wearing as many layers as possible. Even on a bright clear day, the winds can reach up to 100km/h.
The key to surviving Torres Del Paine’s climate it layering. Try to pack a mix of thin under-layers and warmer, insulated outer layers.
Clothing Essentials: Zip-off convertible hiking trousers x 2, t shirts x 5, warm jumper, fleece jacket, waterproof jacket, hiking socks x 5, underwear x 5, hiking leggings or long johns, gloves, a warm hat, scarf and a lightweight travel towel.
Hiking Essentials: Good quality walking boots, hiking poles, a 50 – 60 litre rucksack for your main gear, a 15 litre daypack, headlamp or torch, and a water bottle.
Additional Items: Sunglasses, suncream, phone, phone charger and universal adapter, padlocks, compact first aid kit, toiletries, and a good camera.
If you are spending an extended length of time travelling around Patagonia or the South American continent, it’s understandable that you may not want to carry a full range of camping equipment with you for your entire trip and will have to get some when you reach Torres Del Paine. If this is the case, you have 3 options: Buy equipment; Rent equipment in Puerto Natales; Or rent equipment at each campsite in the park.
As Puerto Natales is heavily tourist-focused and you should have no problem finding all of the equipment that you need in the myriad hiking and camping shops. However, for high-ticket items such as tents and sleeping bags, you may be better off purchasing them in Punta Arenas (if you have come from southern Patagonia) as the city’s duty-free status reduces the prices significantly.
I chose to rent all of the equipment that I needed from Erratic Rock in Puerto Natales. Not only is this a fantastic hostel, but they also host a daily seminar, nicknamed the 3 o’clock talk. You can join their expert guides each day at 3pm for a cup of coffee and seminar that covers everything you need to know about Torres Del Paine. This includes current weather conditions, accommodation, equipment, trail routes and transportation.
Erratic rock don’t allow reservations on gear and so operate on a first-come-first-serve basis, so you may just have to hope that they have everything you need. Their prices are below and listed as Chilean pesos per day.
Sleeping bag – CH$3000; Sleeping mat – CH$1500; Trekking poles x 2 – CH$3500; Waterproof jacket – CH$3000; Backpacks – CH$4000; Down Jackets – CH$2500; Gloves – CH$1500; Headlamp – CH$1500; Cooking kits for 3 people (Stove, bowls, cups, cooking pot, & water bottle) – CH$4000

Food on the Trek
Although a hot meal at the end of a hard day of hiking may sound tempting, food in refugios can be incredibly expensive, even by Patagonian standards. They are generally set menus and can be pre-booked online when booking accommodation. Many of the refugios do have shops where you can buy basic food supplies such as rice, pasta and sauces as well as snacks but the prices of these are also inflated.
I recommend bringing enough food for the entire trek, packing plenty of non-perishable items that are easy to carry and cook such as rice, pasta and cans/jars of sauces. Noodles, powdered soups and pasta pots will go a long way to keep you fed and energised throughout the hike. Cured meats or sausages also make a great addition to liven up the meal slightly.
For breakfast, bring some sachets of quick-cook porridge and instant coffee. You will not need to bring any bottles of water with you as you can re-fill bottles in the park’s rivers and streams or at the refugios.
Note: You are only able to use stoves at certain spots within camp sites. If you think you will need a warm coffee or tea while hiking, boil water in a morning and take an insulated flask with you.
Meal Costs at Refugios and Campsites

What Route Should You Take?
The W Trek can be walked in two directions; from east to west, starting at Refugio Las Torres and ending at Refugio Paine Grande; or from west to east, starting with the catamaran ride across lago Pehoe and ending with a spectacular view of the morning light bouncing off the spires of Las Torres at sunrise.
The hike from west to east is the most popular as it offers superior views and ends at the park’s most iconic viewpoint.
ITINERARY OVERVIEW
5 DAYS / 4 NIGHT ITINERARY FOR THE W TREK IN TORRES DEL PAINE
Day 1: Puerto Natales to Grey
Day 2: Grey to Paine Grande
Day 3: Paine Grande to Frances/Los Cuernos
Day 4: Frances to Chileno
Day 5: Chileno, La Torres and back to Puerto Natales
DAY 1 ITINERARY
Puerto Natales to Grey
Distance: 11km/6.8 miles
Time: 3 – 4 hours
7am: Take the bus from Puerto Natales to Torres Del Paine National Park. You will have to hop off the bus at the park entrance to pay the entry fee (CH$35,000) but try to hop off quickly to get to the front of the queue and pay quicky as you will need to re-board the bus in order to get to the next stop.
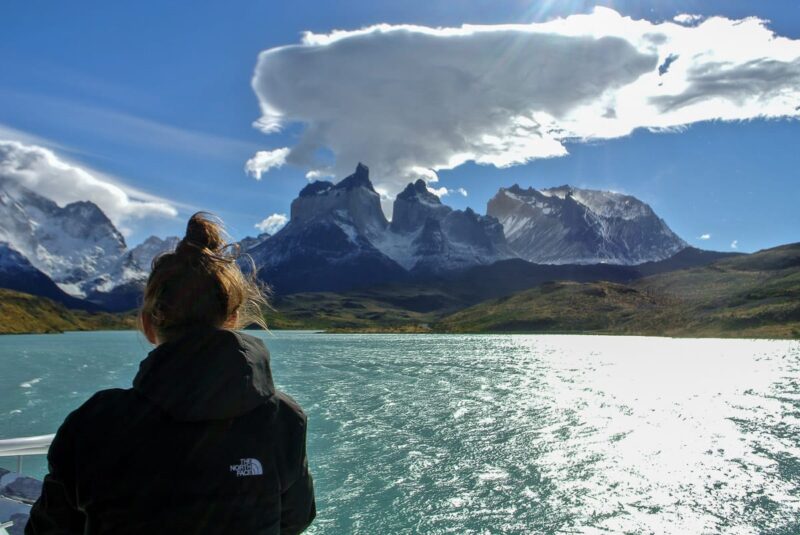
10am: You should arrive at Pudeto sometime between 10am and 10.30am giving you enough time to head to the ferry office and buy a ticket for the boat ride over to Paine Grande. The ferry is operated by Hielos Patagonicos and costs CH$18,000 one-way. If you have enough time before departure, you may be able to visit Salto Chico waterfall but if not, the boat ride in itself offers spectacular views of the Cuernos del Paine’s horn-shaped peaks. The usually leaves around 11am but timetables can change depending on the weather conditions.
You should arrive at Paine Grande between 11.30am and 11.40am and from here you will begin your first day of trekking.

If you want to Hike the W in 4 Days / 3 Nights...
It is possible to do the hike in one day less by hiking from Paine Grande up to Glacier Grey and back in one day, but this will mean a long day trekking 22km. You will be able to set up camp in Paine Grande before beginning your hike and just take your daypacks with you – just be sure to take any valuables. Upon reaching the Grey Campsite, you will be continuing along a short trail path to the first rocky outcrop with a spectacular view across Lago Grey to the glacier. This viewpoint is only around 1km from the campsite but as the path between Grey and Paine Grande closes at 4pm (you are not allowed to begin your hike after this time), you won’t really have time to hike further north to any of the other viewpoints.
The entire hike will take around 6 hours and with the time spent admiring the glacier, you will probably arrive back at Paine Grande between 6pm and 7pm, ready for the next day of hiking (day 3 in this itinerary).
From the pier at Paine Grande, the clearly marked path initially leads north through scrubland before meandering into Quebrada de Los Vientos, the windy gorge, after an hour or so (I can confirm that it was very windy when I hiked this path). From here you will catch your first glimpse of Lago Grey with enormous chunks of pale blue ice bobbing in its water with the glacier itself peeking out behind the almost black shape of La Isla Nunatak.
Continuing the walk alongside the lake, you will enter an eerily silent lenga wood. Part of this area was badly damaged by the forest fire that sadly ran rampant through the park on 27th December 2011. The devastating fire only affected 7% (about 40,000 acres) of the park’s area but went on for nine days before it was finally extinguished by the fire brigade. Unfortunately, some of the affected vegetation will take 200 years to reach maturity again, but the charred, contorted remains of the trees do add a haunting, melancholic beauty to the area.
You should arrive at Refugio y Camping Grey around 3 or 4pm, giving you chance to set up your tent before cooking dinner if you have opted to camp, or relax with a well-earned coffee or glass of wine if you have pre-booked a dorm room and dinner. While it is still light, you may want to take the small trail that forks off from the main path and head over to the glacier viewpoint on the shore of Lago Grey (1km walk).
DAY 2 ITINERARY
Grey to Paine Grande
Distance: 19km/11.8 miles
Time: 7 hours
Starting your hike at 8am, you will head north from Grey, towards the viewpoints that overlook Glacier Grey. You can leave the majority of your equipment and gear at the campsite or refugio as and just take your daypack and valuables as you will be looping back to Grey again on your way towards Paine Grande.
Walking alongside Lago Grey, you will eventually reach a series of rope bridges suspended over gorges that offer spectacular views of the Glacier and, on a clear day, the entire ice field. The icy ramparts tower as high as 100m in some places and the glacier stretched the entire 6-mile breadth of the lagoon, grey in both name and colour, only brightened by the shimmering turquoise of the glacier and the bobbing icebergs that navigate its waters.
This section of the hike is around 3.5km each way, meaning that you should arrive back at Grey before lunch, just in time to retrace your steps from the previous day and walk the 11km trail back to Paine Grande.


DAY 3 ITINERARY
Paine Grande to Frances or Los Cuernos
Distance: 20.5km/12.7 miles
Time: 7.5 hours
Leaving Paine Grande at around 8am, you will begin a 2-hour walk eastbound along the scrubland bordering Lago Pehoe, before catching a glimpse of the blue waters of Lago Skottsberg with the towering 3000m peak of the Paine Grande massif on your left-hand side. After around 2.5 hours and crossing a wobbly bridge, you will reach Italiano, a free campsite where you can leave your bags with the ranger before continuing the hike.
The steep path leading up Valle Frances, the middle section of the W, can either be a breeze of a slog, depending on the weather conditions but the 1-hour section leading to Mirador Frances isn’t too challenging no matter the weather. Here you will find spectacular views of Glacier Frances and Glacier Los Perros and it is the perfect point to stop for a quick lunch beside the turbulent Rio del Frances. On my W-Trek, this is the point I had to stop my journey up Valle Frances: blizzard-like conditions had left me freezing cold and the trail had become dangerous so I had to turn around.
Terrible weather isn’t uncommon in this section of the park, but if you have a clear day, continue onwards through the woods towards Mirador Britanico. It is an additional 3.5km/1.5 hours each way but the lookout is one of the best in Torres del Paine, giving you a close-up view of Los Cuernos. Ensure you have hiking poles as the steep walk down can be a little treacherous.
If you are staying at Campamento Italiano, you can set up for the eveing and relax, otherwise, it is another 30-minute walk along the shore of Lago Nordenskjold to Frances. If you feel like you will have the energy to do it, you can book to stay in Refugio y Camping Los Cuernos, a further 2-hour hike along Lago Nordenskjold. This will make your walk on day 4 significantly shorter and they even have double cabins available if you fancy a quiet night away from a dorm.
DAY 4 ITINERARY
Frances to Chileno
Distance: 17km/10.6 miles
Time: 5 hours
If you are staying at Italianos or Frances, you will need to start your penultimate day of hiking at 8am. If you have opted to stay at Los Cuernos, you can treat yourself to a well-deserved lie-in, leaving the refugio at 10am to begin your walk.
The hike begings with a long, meandering walk along the lake through hilly scrubland and across small glacial streams before you turn northwards into Valle y Rio Ascencio for the uphill, 2-hour slog to Chileno. You will have an early start the next morning in order to see the towers of Mirador Las Torres at sunrise, so ensure that you get an early night
DAY 5 ITINERARY
Chileno to Las Torres & Back to Puerto Natales
Distance: 13km/8 miles
Time: 6 hours
To see the sunrise at the famous Mirador Las Torres, you will have to wake up well before dawn at around 4.30 to begin your walk pre-5am. Just take a small bag of warm clothes and food, as well as a headtorch, for the steep 2-and-a-half-hour ascent to the towers alongside the Rio Ascendio. The final part of the climb is a 1-hour long scramble across boulders and rocks, emerging in front of the magnificent Torres, their peaks reflecting in in the still waters of Laguna Torres. When I visited in March, sunrise was at 7.30am.

If you feel up to it, you can hike further north through the aptly named Valle de Silenco (1 hour each way) to the little-visited Mirador Japones, otherwise, the hike back to Chileno to collect your backpacks and equipment is a little easier than the morning’s ascent, taking just 1.5 to 2 hours.
The W Trek ends with the walk back down Valle Ascencio to Hotel Las Torres (2 hours; 5.5km). From here, you can either catch 2pm shuttlebus (CH$5000) to Laguna Armarga in order to board the 2.30pm bus back to Puerto Natales or walk the extra 1.5 hours to Laguna Amarga Ranger Station yourself just make sure you arrive in time to get one of the buses.
Alternatives to Hiking the W
For more experienced hikers, the O-Circuit is a challenging seven to ten-day hike that includes the entirety of the W, with the addition of a trail that leads walkers further north, around the back-side of the Torres. This allows you to catch glimpses of the park’s much-quieter outer reaches as well as have bragging rights over anyone that has hiked the W.
While the circuit starts and ends at Paine Grande, some people decide to stay on the shuttle bus past Lake Pehoe until it reaches the Park Administration building, adding a scenic 5-hour walk onto the circuit, which is called doing a Q.
If a multiday trek isn’t for you, each of the W’s sections can be split into day hikes while staying over night at some of Torres Del Paine’s luxury lodges or eco accommodation spots.


2 Responses
Hello David, thanks a lot for posting about your Patagonia W Trek trip. I found it very helpful as my wife and me are preparing to visit the trek in October this year. I have one question on the routing: Is it possible to start the hike at the “left top” of the W near Refugio Grey? On your map it looks like there is a boat trip available to get there. It would enable us to not walk the same way twice between Grey and Paine Grande.
Thanks a lot in advance,
Best
Nils
Hi Nils. I’m glad that you found the post helpful! As far as I am aware, you can only take the boat across to Paine Grande, meaning you will have to hike the section between there and Refugio Grey in both directions (at least this is what I had to do). I think the boat trip shown on the map doesn’t actually stop near Glacier Grey.